
Overview
The RPA Accelerator is composed of Opportunities, Workstreams, and a Program. In Shibumi, these are all called work items. They are places to review and add information. Each of these work items are made up of Tabs and Sections.
Tabs
Select a tab to view other pages within a work item. Select the left and right arrows to navigate through the available Tabs. The first Tab is only the Tab available in the Preview Panel. Depending on your access right or stage of your opportunity, you may see different tabs. Below is an example of tabs in an Opportunity that has been deployed.
The tabs available in this example are Opportunity Summary, Details, Activities, History, and Execution Tracking.

Sections
Lists & Views
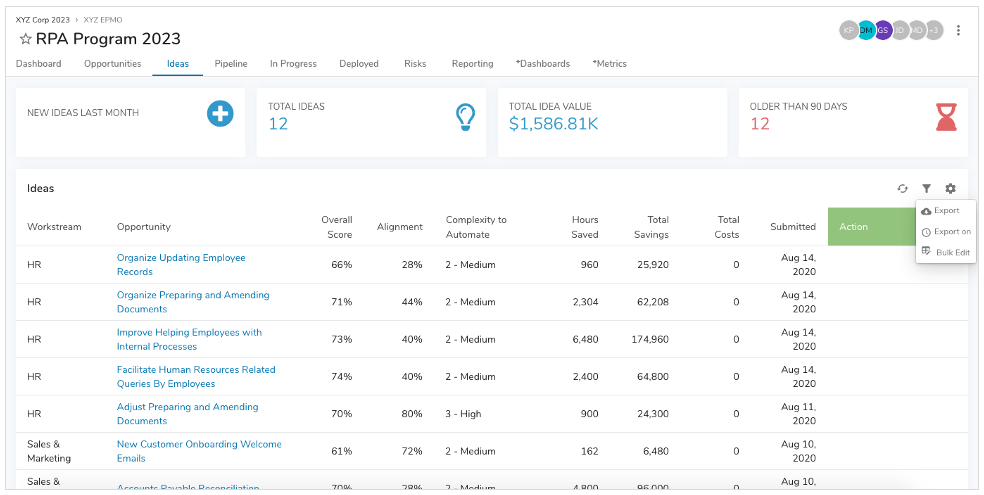
Vast amounts of data can be daunting to manage. Shibumi makes it easy to create and view this data. From Lists and Views, you can do the following:
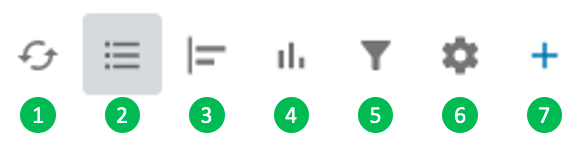
- Refresh: Refresh a specific section to return new data. New data is available when the Refresh icon is blue.
- Report View: Ability to view data in a table format.
- Gantt Chart: Ability to view a time-based graphical representation of Start and Due dates, The colors are tied to the Status.
- Charts: Ability to view data in a variety of charts.
- Filter: Ability to filter a List/View based on an attribute or role.
- Sort: Ability to sort a List/View by recently updated or by columns in the section.
- Settings: Export and Bulk Edit options are available within the Settings menu.
- Create: Ability to add to a List by selecting the + button and adding one or multiple items. This option is not available on Views.
Section icons are available on hover of the upper right corner of Lists/Views. The Create button (plus icon) is always displayed on Lists.
Report View
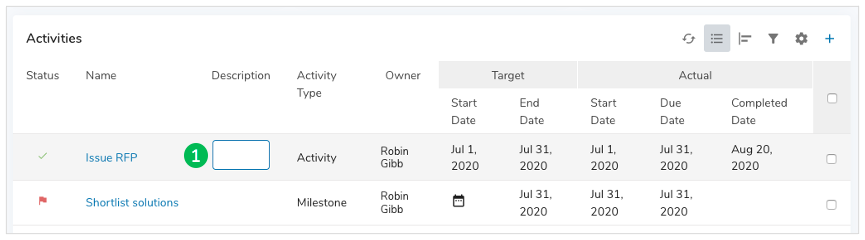
- Edit: Ability to edit an item (that you have permissions to edit) by selecting inside a cell and changing the value.
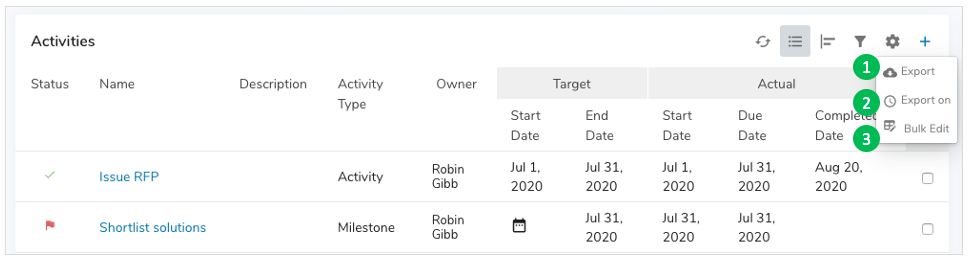
- Export: Generates a CSV file that downloads immediately to your computer. The file will only include columns on the List/View. If the hide filter is on, it will not show the hidden columns.
- Export On: Schedule an Export to run on a recurring cadence. View all scheduled exports on your My Account page.
- Bulk Edit: Allows users to bulk edit large Lists or Views of data in the context specified for the type filter.
Chart View
Depending on the List/View type and configuration, you will have different chart types available. By toggling into the chart icons on the upper right-hand part of a section, you have the ability to change the way you see your data.
In the example below, you can see the options for a line chart, bar chart, and a donut chart. The donut chart is the one currently being displayed.
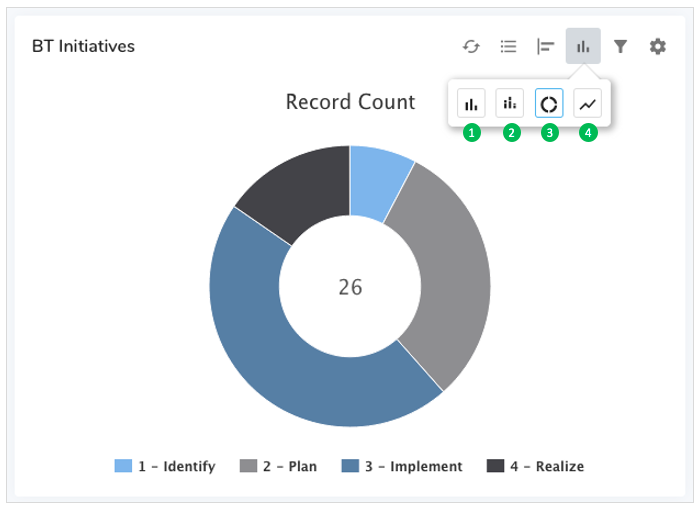
- Stacked Bar Chart
- Line Chart
- Bar Chart
- Donut Chart
Filters
In any List or View of data, there is the ability to filter data by selecting the filter icon. The filter icon is located at the top right of the section. Clicking on it reveals the filter bar with the ability to type into or select values for unlocked filters. Typing text into a filter field will search for any items whose value contains that text.
Dropdown Filters
| Filter Name | Meaning |
| Limit |
|
Toggle Filters
Some attribute filters are displayed as toggles rather than text, numeric, or date fields.
| Filter Name | Meaning |
| Active/All |
|
| Show/ Hide |
|
Filter Operators
Operators specify how filter criteria relate to one another. Refer to this list of filter operators when setting filters on Lists, Views, Dashboards, and some custom fields.
| Action | Operator | Meaning | Supported Filter Type(s) |
| OR | Comma-separated (,) | Filters on any of the values entered | Text, Numeric |
| AND | Plus sign separated (+) | Filters on a combination of values | Text, Numeric |
| Exact Match | Surround values in quotes e.g. “Insert Values” | Returns results matching all entered values | Text, Numeric |
| Empty Values | Enter double quotes e.g. “” | Filters on fields containing no value | Text, Numeric |
| Less Than | < | Evaluates if a value is less than the value that follows this symbol | Numeric |
| Greater Than | > | Evaluates if a value is greater than the value that follows this symbol | Numeric |
| Less or Equal | <= | Evaluates if a value is less than or equal to the value that follows this symbol | Numeric |
| Greater or Equal | >= | Evaluates if a value is greater than or equal to the value that follows this symbol | Numeric |
| Not Equal to | != | Excludes values from your results | Text, Numeric |
Sort
Users are able to sort their Lists and Views with our Sort By options. In the Sort By drop-down, users may select one or more columns to determine the sort order. If you would like to sort items by ascending or descending order, simply click on the arrow next to the item to toggle the sort order direction.
Notes:
- Column headers and updated date are available as Sort By options.
- When sorting by ascending order, blank items will appear before alphabetized items (the opposite is true for descending order).
Create
Users are able to add items to a List by selecting the blue plus icon in the upper right-hand corner. This option is not available on Views. Create New allows you to create one item, Create Multiple allows you to bulk create.
Export
It is easy to export your data from Shibumi. To manually export data from a List or View section, simply select the Settings gear icon at the top right of the section and select “Export” from the drop-down options.
Data is exported based on filter and sort order configurations. All available results are returned regardless of the Limit filter configuration.
When you open the exported file in Excel, the structure of the columns will match the structure from the List/View.
Note: If you’d like to export in a different format, please change your account settings in User Preferences.
To schedule an export, click “Export on” to open the scheduling dialog. Select a start date, cadence (weekly or monthly), and frequency (e.g., every 2 weeks on Friday). To cancel a scheduled export from the section, open the scheduling dialog and select Cancel Schedule in the bottom left corner.
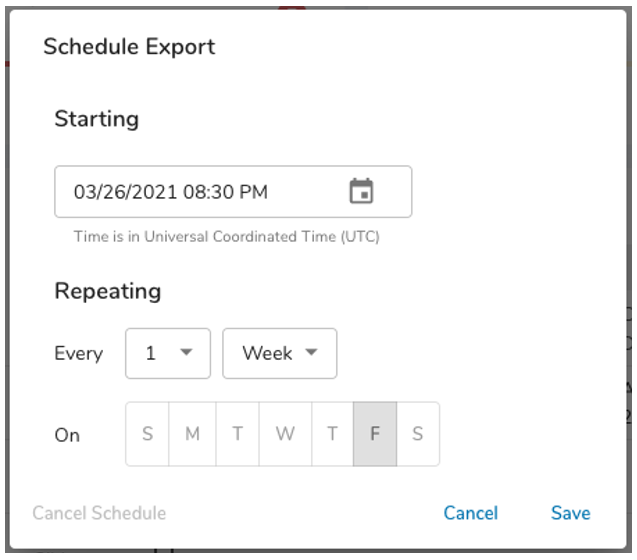
When a scheduled export runs, it only takes locked filters into account. Exports can only be scheduled when the Type filter is locked. If a type filter becomes unlocked after scheduling, the export will not complete.
To view all of your existing scheduled exports, go to your Account page by hovering over the user icon in the Navigation Sidebar and selecting Edit My Account.
Note: Exporting may be disabled in your solution.