
| Goals | Topics to Cover |
|
|
As an App/IT Admin, you provide technical support to the Automation Team.
For example, if your organization has opted to implement Single Sign On, you’ll work with the Shibumi support team to configure authentication through your SSO Identity Provider.
Additionally, you’ll configure the integration between the RPA Accelerator and your automation solution (e.g., Blue Prism, Automation Anywhere, UIPath). This integration aggregates data into the Accelerator and provides visibility into the achieved value for each automation. The Automation Program leadership team made decisions to invest in each opportunity based upon the anticipated value to be achieved when the automation is delivered. With the planned versus actual achievement data consolidated in the Accelerator, investment decisions can be validated and confidence in future results will improve.
Within the RPA Accelerator, you’ll register the digital workers responsible for execution of the automations. Once registered, you’ll monitor the real-time information from the digital workers to assess capacity and to ensure that your organization is utilizing them to their full potential.
Before you can access the RPA Accelerator, however, you must Join Shibumi and create an account.
Access the Program
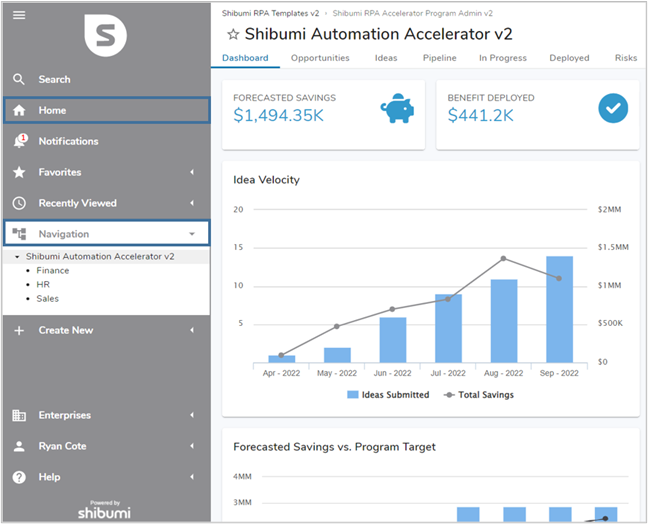
After creating an account, you will be authenticated into the RPA Accelerator with the program level content displayed by default.
The program is defined as the homepage. In addition to the Home Icon, you can use the Navigation Tree to see and access the program and workstreams. You can access these from any page (both routes are highlighted below).
Note: when your Automation Lead set up the RPA Accelerator, they invited you into the Program level which triggered the email prompting you to join Shibumi. Permissions are inherited downwards within the RPA Accelerator. Since you were invited into the top-level Program, you have the ability to access and edit all unlocked data. Someone invited into a specific, lower-level Opportunity, however, would only be able to edit information specific to that opportunity.
Add an Automation Process and Reference Digital Worker Data
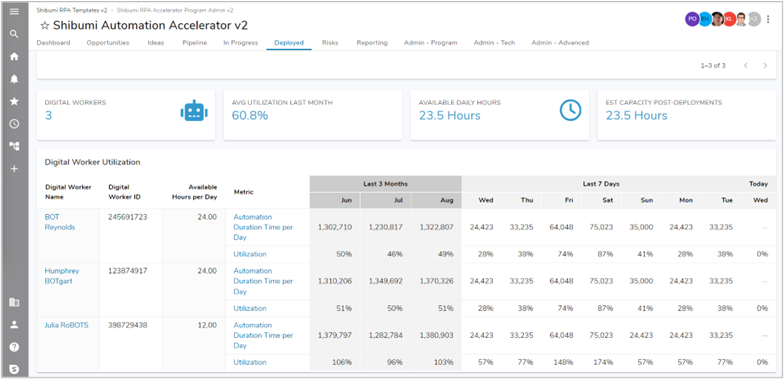
On the Program, the Deployed and Reporting tabs show key information about digital workers.
You can access the tabs by clicking on the tab names. The name of the currently displayed tab is highlighted in blue. By default, you will land on the Dashboard tab.
The example below shows the Deployed tab content and highlights the digital workers.
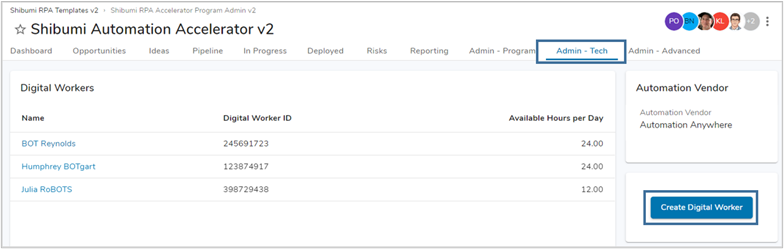
As an App/IT Admin, you will have visibility to tabs unique to your job requirements. On the Admin – Tech tab, you can create new digital workers by selecting the blue “Create Digital Worker” button on the right side of the page. Input the Name, ID and Available Hours per Day for the worker within the Create Digital Worker dialog, once done they can be added to any opportunity.
You can review digital worker information from the Deployed tab. You can also review and update the digital workers information, as well as add automations, directly on an opportunity.
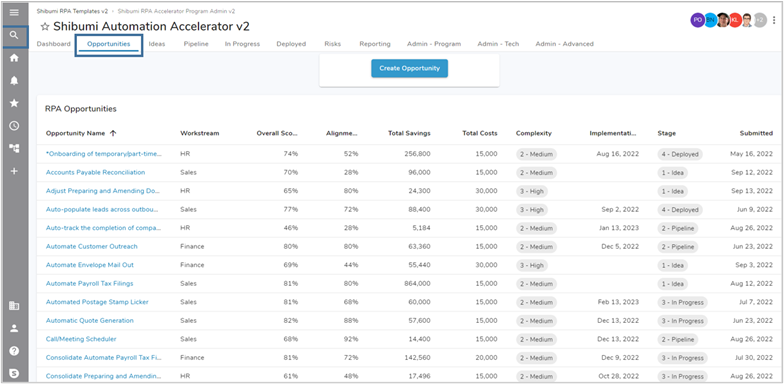
Either use the Opportunities tab to search for the opportunity you’d like to update, or use the Search option (magnifying glass icon) on the navigation side bar.
Once you navigate to the opportunity, you can update the information on the Execution Tracking tab.
Note: The Execution Tracking tab is only available on opportunities that are In Progress, Deployed, or Completed.
To add an automation process, click on the blue plus button displayed at the top right of the Automation Processes list. Enter a name and the automation ID. After creating the process you can assign it to a digital worker and add the cost per failure.
![]()
Note: Once a process is created, the associated KPIs will be displayed in the Execution Metrics section.