
Overview
In Shibumi, items created on a work item have a hierarchical relationship with the item on which they were created. This relationship allows for aggregation of KPI values and review of content within the hierarchy. There is often, however, a desire to review the program data across the hierarchical boundaries.
Associations can be created to define relationships between work items that do not have a hierarchical relationship.
For example, in an RPA Opportunity with an ancestor hierarchy of Account, Region, and Program, you could associate an Opportunity with the Automation Vendor that is used to deliver the automation.
By configuring this association:
- Users would be able to easily select the Automation Vendor through a look-up, pick list style field.
- Once populated, by clicking the association hyperlink, users could navigate from the RPA Opportunity to the Automation Vendor detail.
- Users could also create dashboards and presentations on the Automation Vendor work item to see the aggregation of KPI data from all associated Opportunities.
In general, associations should be used when:
- You want to review content for all work items with the same value in the association field.
- The set of work items with which you would define the association is likely to change often.
Defining the Association
To establish an association, two components are required:
- A query attribute
- The template that the query attribute is associated with
Once the association is configured, you can:
- Include the query attribute on any form, list, or view on the template
- Define editability rules to constrain who can edit the query attribute value,
- Reference the association in your business logic expressions.
Configure the Association Query Attribute on the Data Panel
On the template Data Panel, click Create Attribute and select Association.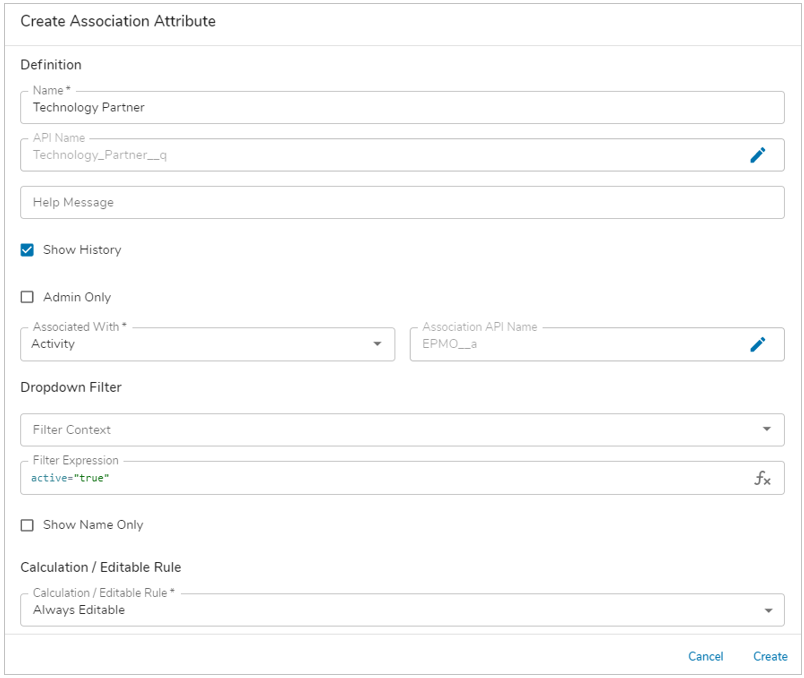
- Enter a name for the association query field. An API name will automatically be generated based on the name. (Optional) Define a help message.
- (Optional) Select whether to show the history of the Association within a history section.
- (Optional) Select whether the Association will only be available to App Admins in Add Field/ Add Column / section configuration dialogs.
- Select which item type to associate with from the “Associated With” dropdown.
- If necessary, edit the Association API name so it is easily identifiable (e.g., Opportunity Lead Partner).
- (Optional) Select a context for the association filter. This is only necessary if the association will be based on another association or an ancestor (e.g., only show child items of the selected value of another association). All ancestors and associations of the current template will be listed.
- (Optional) Enter an expression to filter visible association values in the query attribute dropdown field. This controls which work item instances appear in the dropdown. Use the this. prefix to reference attributes of the current item.
- By default, the association query drop down field will display the Auto ID, Name, and breadcrumb trail for all possible association options. To only show the Name in the drop down, select the Show Name Only checkbox.
- (Optional) Enter an Editable Rule to determine when an association can be edited or set a Calculation to automatically determine the association value. The .instance() function can be used to reference the specific instance of the template.
- Click Create. This adds an association query attribute to the current template and an association reference on the item with which it is associated.
- Publish the template.
Adding Association Query Attributes to Lists & Views
Once an Association query attribute has been defined, it can be added to a List or View following the same process that is used for any other attribute.
- On a work item List or View, click on the Settings gear in the top right of the section.
- Select Customize.
- Click the blue plus button in the formatting bar to open the Add Column dialog.
- Choose the association query attribute name from the list of Attributes.
- Click Add.
- Save the section.
Referencing Associations in Expressions
Associations can be referenced in expressions to aggregate data horizontally across solutions. Association references can be used anywhere the Shibumi Expression Language is available. Learn more about the syntax for referencing associations here.
Populating the Association
On a work item, the association query attribute is displayed as a look-up field.
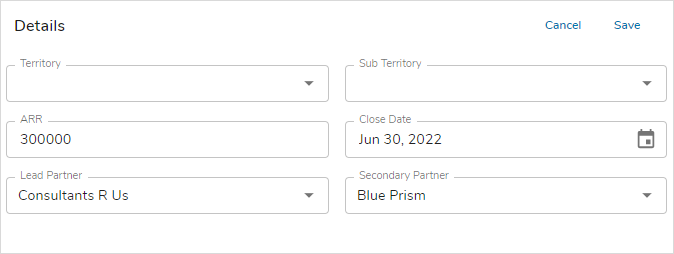
While the association is undefined, the field acts like a pick list. If there are more options than can easily be displayed in the pick list, a search capability is introduced. You can begin to type either the ID number or Name of the desired association item. Shibumi will reduce the pick list to just those instances of the associated template that match your entered value. Select a value to populate the association.
Once the association query is defined, the pick list field is replaced with a hyperlink to the associated work item. Click on the hyperlink to navigate to the work item.
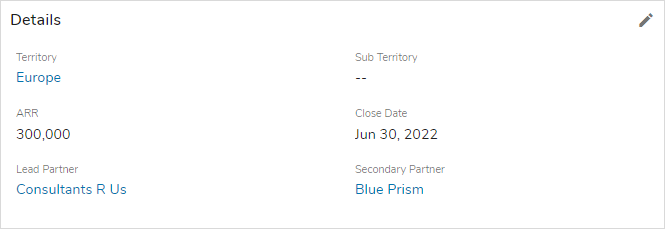
Note: Shibumi permissions apply. You will only be able to open the work item if you have access rights to do so.
To edit the association, click on the pencil icon displayed when you hover over the association value. The searchable pick list field will be displayed for you to replace the existing value.
The same pick list behavior displayed when the query attribute is included as a form field is provided when the query attribute is included as a column in a list or view.