
There are five actions that can be triggered by business rules:
- Assign Role
- Create Work Item
- Send Notification
- Set Value
- URL Call
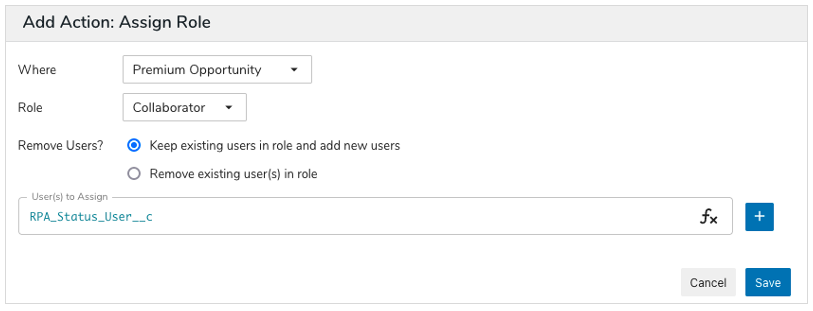
Assign Role
This actions allows you to assign roles on a work item in the solution hierarchy.
- Where – Select the work item type where the role will be assigned.
- Role – Choose which role will be assigned.
- Remove Users? – Choose whether users currently holding the role should be removed when assigning new users or if they should remain in the role with the new user(s).
- User(s) to Assign – Enter the user(s) to be assigned to the role when the rule is triggered. This field accepts role API names, attribute API names that resolve to email addresses, hard-coded email addresses and open resources in double quotes (ex. “[email protected]” or “Project Manager”).
- When referencing a text attribute, the value must be a list of semicolon-separated email addresses with no spaces (ex. [email protected];[email protected]).
- When referencing a Name Value pick list with an email address stored as the value, the .value suffix must be used after the attribute API name (ex. Stage_3_Approver__c.value).
Example: Assign Role
Example 1: Reference a role from the parent of an associated item.
User(s) to Assign: Program__q.Resource__t.Program_Manager__r
Example 2: Reference a role from an associated item.
User(s) to Assign: Initiative__q.owner
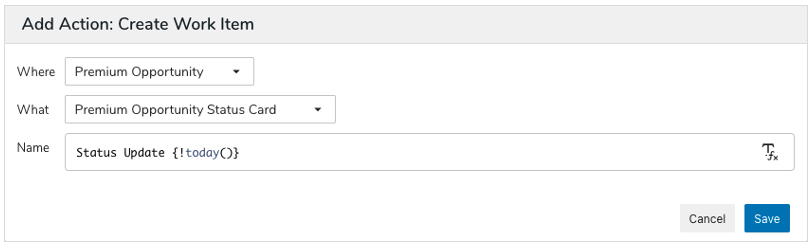
Create Work Item
This action allows you to create a new work item in the solution hierarchy when a rule is triggered.
- Where – Select the work item type on which the work item will be created.
- What – Choose which work item type to create. Based on the solution configuration, this list dynamically updates when the Where option is selected so that it only includes items that can be created on the template selected in the Where setting.
- Name – Enter the name of the work item to be created. Dynamic references to attributes can be included using the {!attribute_api_name} injected expression format.
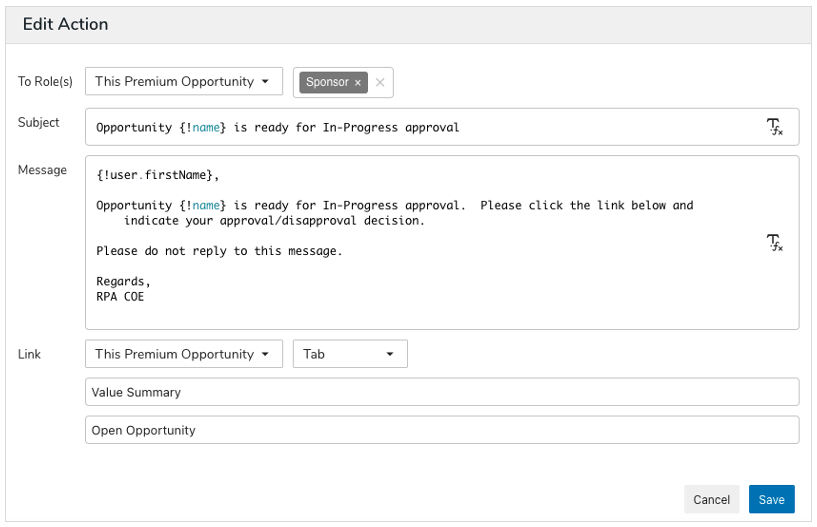
Send Notification
This action allows you to send notifications to individuals that hold roles on a work item in the program hierarchy.
- To Role(s) – In the first dropdown, you can select the work item type that will contain the roles of the individuals who should receive the notification (choose “This [Item]” if the roles will be on the current work item). The next dropdown will update to show the enabled roles on the selected work item type. Select one or more roles to which the notification will be sent.
- Subject/Message – Enter a notification subject and message. Dynamic references to attributes can be included in your notification subject and body using the {!attribute_api_name} format.
- Link – A linked button can be included in your notification to either a dashboard, presentation, or a specific tab on the work item. First, select the context of the link (choose “This [Item]” if the link will be on the current work item). Next, select whether to link to a tab, dashboard, or presentation. Enter the exact name of the tab, dashboard or presentation in the Name field. Finally, enter the text you’d like to appear on the linked button (ex. Click Here to Approve). Click Save.
Example: Send Notification
Example 1: Send approval notifications to the approver role, when an initiative is in stage 3 and ready to approve field is edited and set to yes.
- Run: On Edit of Ready to Approve attribute
- Condition: Stage__c=“3” and Ready_to_approve__c=“Yes”
- If True: Send Notification: Approver
Example 2: Send notification to the owner when the due date has been modified.
- Run: On Edit of Due attribute
- Condition: <none>
- If True: Send Notification: Owner
Example 3: Remind collaborators and owners to submit data on the last day of the month.
- Run: Scheduled Monthly, Last Day, 11am UTC, Every 1 Month
- Condition: <none>
- If True: Send Notification: Collaborator, Owner
Example 4: Notify task owners that the due date is today and they need to compete a task.
- Run: Scheduled Weekly, SMTWTFS, 11am UTC, Every 1 Week
- Condition: dueDate=today()
- If True: Send Notification: Owner
Note: When creating content in the Subject or Body of the notification, wrap references to attributes and expressions with {! }. E.g., Hi {!user.firstName}.
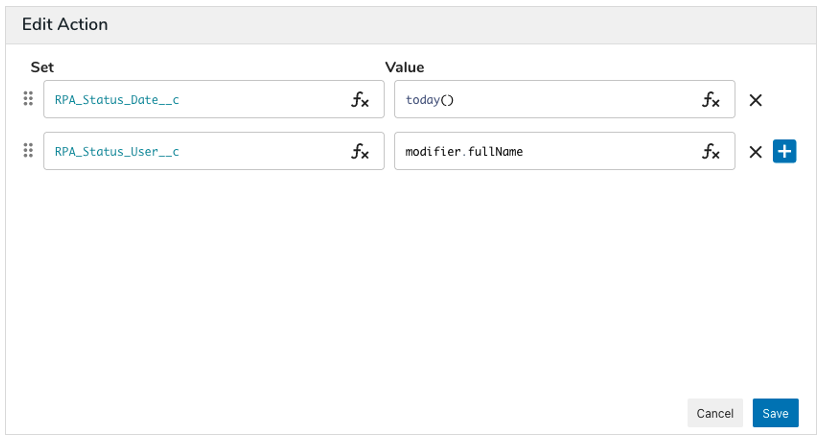
Set Value
This action allows you to set the value of an attribute, metric, or association.
- Set – In this field, enter the API name of the attribute or metric whose value you’d like to set. Start typing and predictive text will appear to help autocomplete the API name. Values can be set for parent/ancestor attributes or metrics as well.
- Value – Enter the desired value using the appropriate format:
- Dates: Use the “MM/DD/YYYY” or “YYYY-MM-DD” format, including the double quotes, or reference today’s date by using the today() function.
- Dynamic references: To set an attribute or metric to the value of another attribute, start typing the attribute name and predictive text will appear to help you auto-complete the API name. These do not need to be within double-quotes.
- Text: Enter all text within double-quotes. To combine text and dynamic references, use an ampersand. Ex. “Project completed on “ & finishDate & “.”
- Numeric: Numeric values do not need to be within double-quotes. Basic math functions (+, -, /, *) can be used to calculate numbers or numeric dynamic references. E.g.,. Number_Attribute__c +5
- Associations: Reference a specific work item to set an association by using the instance() function, an association query field (Association__q), or ancestor item (Template__t.instance()).
Example: Set Value
Example 1: Admin would like to document approval date but approver doesn’t want to manually fill it out.
- Run: Edit Approval
- Condition: Approval__c=“Yes”
- If True: Attribute: Approval_date__c Value: (today)
- If False: Attribute: Approval_date__c Value: “”
Example 2: Measure expected work week volume for daily savings.
- Run: On Create
- Run: On Edit Estimated Daily Volume
- Condition: <none>
- If True: Attribute: Estimated_Weekly_Volume__c Value: Estimated_Daily_Volume__c * 5
Example 3: Set stage after work item has been approved.
- Run: On Edit Approval
- Condition: Approval__c=“Yes”and Stage__c=“2”
- If True: Attribute: Stage__c Value: “3”
Note: Set multiple values in the same action by using the + button after the first assignment.
URL Call
This action allows you to trigger a call to an external URL when a rule runs.
- Name – Enter a descriptive name for this action.
- URL – Enter the URL you’d like to call when the rule triggers. Dynamic references can be included using the format {!api_name__c}. When you begin typing your attribute name, predictive text will appear to help you auto-complete the API name. This reference will be resolved using instance data when the action is triggered (ex. {!name} will resolve to the name of the instance that triggered the rule).
- Click Save